Saturday, August 18, 2012

Moroccan Spice Scones and Divergent

Cooking!

In my latest Tea Infusion Adventures, I teamed up with my friend Akasha and her aunt at their tea selling and catering business Elegant Teas. They gave me some of their delicious tea blends to bake into some tasty sample pieces for Fremont Festival of the Arts earlier this month.

I used my Earl Grey Recipe to make some mini Earl Grey Cupcakes with their tea leaves. They were the perfect size for a little sample.


I also slightly adapted this recipe for my first foray into the world of scones. They turned out to be the perfect texture, moist and soft, but still firm.


Moroccan Spice Scones 
(makes 16 smallish scones)

To infuse the tea, heat in a saucepan:

1 2/3 cup heavy cream
3 tbsp Moroccan Spice (or Chai, or whatever) tea

Allow to steep for 5-10 minutes, but don't let it come to a boil or develop a skin. The owner of this recipe suggested letting the whole mixture sit in the fridge for one hour or even overnight. I settled for 2-3 hours and it was tasty and flavorful.


To prepare your dry ingredients, mix together:

2 2/3 cup flour
5 tbsp sugar
4 tsp baking powder
a pinch of salt

I've been learning a lot while reading Bakewise, by baker, cook, former chemist, and all around brilliant lady, Shirley Corriher. One of things I'm doing now, thanks to her, is taking care to mix my dry ingredients thoroughly, so the leavener (baking powder, in this case) is evenly distributed. I use a whisk, generally, thought giving it a good beat in the mixer is preferable. 


Finished scone, waiting to get eaten!
The next step is to cut the butter into the dry ingredients. You can do this by crossing two knives through the mixture for the next eight years, using a pastry whisk, squishing it with your fingers, or, by far the easiest, putting it through the food processor.

However you choose, cut into the dry mixture:

5 tbsp unsalted, cold butter

You butter doesn't have to be rock hard, but it should definitely not be room temperature. At the end of the process, you should have a bowl of crumbly little dough bits. Add to these:

2 tsp vanilla extract (you can use a vanilla bean instead, just add it to the whipping cream first)
1 1/3 of the heavy cream (as you will lose ~1/3 cup in the leaves, from infusing)

I find it easiest to fold these ingredients in with a spatula, and then with my hands as the dough gets more difficult to work with. At this point, I like to tip the whole thing on to a flour-dusted table, while I mold it into two circle shapes, about 3/4 inch thick.


Here you can bake the scone plain or garnish them. I took some of the tea leaves remaining from the infusion and rubbed them over the top of the scones, and then I sprinkled it with some coarse sugar and cinnamon pieces (Trader Joes has a nice Cinnamon Sugar Grinder that I just unscrewed). Finally, take  a sharp knife and mark out your scones. It should look like a pizza, with slices marked, but not separated. Bake the scones at 475 degrees for 12-15 minutes, or until the edges a slightly browned.


We gave away a bunch of sample to satisfied and intrigued vistors to our booth, and we sold several little packages of my sweets infused with their tea. It was so cool to see my baked goods packaged all serious-like. Akasha did a great job with adorable packaging and I'm super excited to work with her and her aunt again!


Reading!

Divergent by Veronica Roth

I am a big fan of Young Adult novels, particularly set in some futuristic dystopian-type society. So when Veronica Roth talked about her book on a panel at a Harry Potter convention I attended in July (hey, don't judge), I was intrigued, to say the least. I picked it up at the convention, managed to hold off on it until I finished my summer classes, and promptly devoured it.

Divergent takes place in the indeterminate future, but technology does not play a huge role, as it often does. Instead, Roth examines how society is different. Human have split into five factions, based on the different qualities they think are the most important to keep people peaceful and good. Abnegation cultivates selflessness, Candor adheres to honesty, Dauntless values bravery, Erudite seeks knowledge, and Amity holds peacefulness highest. At the age of sixteen, everyone takes a tes to suggest which faction they fit most in, but the ultimate choice is left to them. Most teens choose the faction they were born into. Some, however, choose to leave and seek their fortunes in another faction, leaving behind their family, friends, and the life they've known.

Tris Prior is one of these, switching from Abnegation to Dauntless. The story follows her as she makes this difficult decision and moves through her competitive, violent, dangerous training to become a true member the Dauntless faction. Per the YA standard, there is a lot of stress from her crisis of identity, difficulties with friendships, romances, and loyalties, family troubles and betrayal, and a lot, lot, lot of violent descriptions (someone loses an eye!).

I loved the premise of this book the most. It's what drew me in and kept me there. The characters are enjoyable enough, and Tris is reasonably sympathetic, but none of the character captured my heart and imagination in the way I need them to for a book to be truly great. However, YA books tend to run on plot power, and this one is no exception. Even when I was a bit exasperated with the characters, the book was hard to put down because I just had to know what was going to happen next. The plot was fast-paced, interesting, and difficult to predict.

Though it's no second Hunger Games (my secret hope when I got it!), I do still recommend Divergent and am excited to check out the second in the trilogy, Insurgent.

Monday, August 6, 2012

Sweet Corn and Blackberry Popsicles and The Secret Life of Bees

Cooking!

Pinterest has been a wonderful boon on my creative output. At this very moment, as I write this, I am waiting for some chocolate ice cream to set in the freezer and a coat of polyurethane to dry on a floor mat I'm making, both thanks to someone else's cleverness and Pinterest. 

The reason I mention this is that this recipe comes from a pin I saw a few days ago that led to this NPR article about blackberries. In case you weren't aware, I love blackberries. Out of all fruits, they are second only to boysenberries, and general just end up winning, since boysenberries are never at the farmer's market anymore.

Now if you clicked on that link, you might have noticed that there are a few tasty blackberry recipes there, but the most intriguing (to me anyway) is for Sweet Corn and Blackberry Ice Pops. Corn is tasty, to be sure, but not the first thing that comes to mind when you think of breaking that summer heat with a delicious popsicle. Well think again! These are super tasty, easy to make, and completely unique.


Sweet Corn and Blackberry Popsicle Recipe
(makes 6 small popsicles, or 4 medium-sized popsicles)

Shuck and rinse:
2 ears sweet corn

Then cut off the kernels and cut the de-kernels cobs in a few pieces. Put everything together in a saucepan.

Add:
1 1/2 cups half and half
1/3 cup sugar
1/4 tsp salt

Bring the entire mixture to a simmer for a minute or so. You want the corn to turn a deeper yellow and soften. When that happens, turn off the heat.

Add:
1/2 tsp vanilla

Let the mixture cool for at least an hour, preferably a few. We did just an hour and it was tasty, but I imagine the flavor will get stronger if you let it sit for a few more.


In the meantime, rinse and mash:
1/2 heaping cup of blackberries
2 tsp (or so) sugar


You don't want the blackberry mixture to be too sweet, since the corn will be sweet and the sweet/tart contrast is what makes these so tasty.


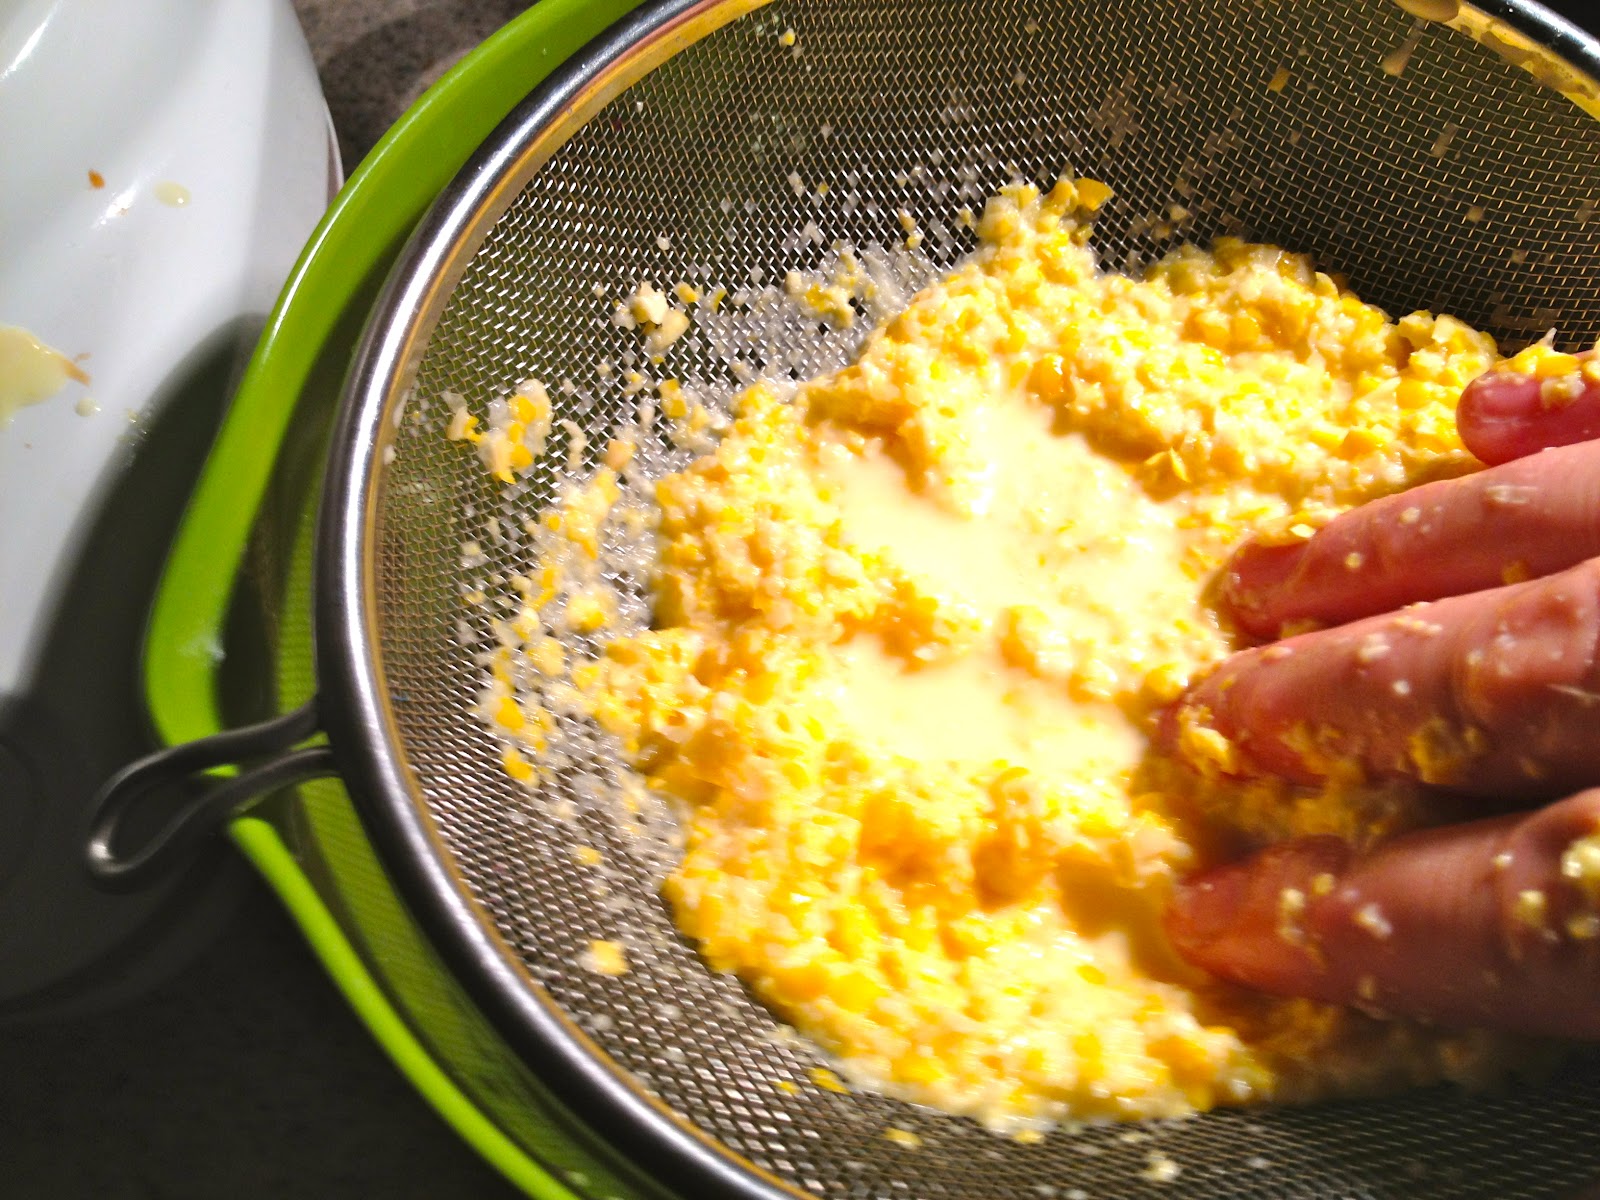
After the corn mixture has cooled, pick out the cob pieces and discard them. Then pour the corn mixture into a food processor or blender and puree it. Pour it through a mesh sieve. You will likely have to scrap and push with your fingers to get all the solid corn bits out and all the corn juice through. That's fine, I'll wait.


Now it's time to fill your popsicles. I had the little ones from Ikea, which hold probably 2 or 2.5 oz. With them, I had the perfect amount for 6 pops.

For pouring, you just want to alternate between the corn and blackberry mixtures. the blackberry is a bit heavier than the corn, but it didn't end up sinking very much in our pops. In fact, most of the blackberries were at the bottom of the pops (the end that is highest during freezing.

Let them sit in the freeze for at least a couple hours to firm up. We let ours sit overnight. If you have trouble removing them, run the plastic under some warm water and they'll slide right out.


Yum!

Reading!

The Secret Life of Bees
by Susan Monk Kidd

I always want to start these reviews by telling you how much I loved the book, but I doubt I'll ever spend a lot of time reviewing a book I really didn't like, so let's just assume I loved this book (I did!). It's been sitting on my shelf for a long time, and it seemed like a summer-y sort of book, so as soon as my summer classes finished, I picked it up. 

The story follows a girl named Lily Owens who lives in a racist little South Carolina town in 1964 with her abusive father T. Ray and her Black "stand-in mother" Rosaleen. Lily is haunted by one of her earliest memories: a fight between her father and mother, a gun that Lily picked up, and a shot that killed her mother. Lily yearns for parental love and forgiveness, but finds none in T. Ray's house. When fierce-hearted Rosaleen gets on the wrong side of the biggest racists in town, Lily takes the opportunity to run away with her and discover her mother's past in the home of three Black sisters and bee keepers. 

I found Lily to be a compelling narrator. She is not particularly exceptional, but her need for a mother's love, which can be so strong at times that it produces a physical, feverish type of pain in her, endeared her to me. She is very much an adolescent, wanting her imaginary perfect mother while blind to the fact that she is surrounded by surrogate mothers ready to take on her cares and protect and love her. Most interesting is her relationship with Roseleen, who is the oldest of her mother figures. It's complicated, because Rosaleen is paid to care for Lily, and because Lily is White and conditioned to see Rosaleen as somehow inferior, and because Lily randomly exhibits classic examples of teenage daughter tension with Rosaleen. She has a tendency to notice Rosaleen's defects (which include crimes such a chewing too loudly) when they are in new or important company, or just when Lily is angry or upset about something else entirely. 

Lily's thoughts on race are interesting to watch develop as well. She constantly questions the racial views of other white people, which she never held to very strongly in the first place. During her time living in the pink house with August, June, and May, she tries to find her place in the house of people who her peers see as "beneath her." She finds herself attracted to a Black boy and must deal with an entirely new element of race relations. She sees racial tensions erupt into racial violence and breed hatred and anger in good people. Her observations are insightful and I enjoyed watching her point of view develop throughout the novel. 

Finally, Kidd's writing style  is beautiful. It's straight forward, with moments of extremem poetry that would make you look up from the book and roll over the words in your mind. These are best when they creep up with you in the text, but here is one for an example. Lily and Rosaleen are escaping and they get in a fight and sit, fuming, on different sides of a river. Lily looks across the river at Rosaleen, and thinks, "In the dark she looked like a boulder shaped by five hundred years of storms."
This book is full of sad things, but it's full of happy ones too, and beautiful ones. The Black Madonna is something I'll leave to the novel, but it is a powerful symbol and story. Happy reading!


Monday, July 30, 2012

RAW Artist Showcase: Oodles of Cupcakes

Last Thursday I was showcased for "Cupcake Art" at RAW San Jose's Mixology event. I had a great time, sold a bunch of cupcakes, and got a ton of feedback, ranged from pleased with my little cakes to downright enthralled (Do note, some of my fans had had several drinks. Still.) I've already blogged about my Rose Cheery cupcakes here and my Earl Grey and Chrysanthemum Peach cupcakes here, so I'll focus this entry on the new-comers.


After all that testing of fruit and florals, I was really craving something chocolate-y. My first impulse was to make half of the rose cherry cupcakes into chocolate rose cherry cupcakes, which I did.


All you need to do to make them chocolate is substitute 1/3-1/4 of the flour in the original recipe with cocoa powder and continue baking as usual. (So 1/2 cup flour and 1/4 cocoa powder for a small batch).


But I wanted something else even more deeply chocolate and decadent. I settled for mocha cupcakes with a layer of chocolate caramel. I based the recipe on this one on Bakingdom, but I tweaked it a bit. She has you brew 2 cups of coffe and add cocoa powder, but I have some delicious Godiva Chocolate Truffle coffee that I wanted to use instead. Since the original cook felt that the coffee flavor didn't come through as strongly as she'd hoped, I made my coffe extra strong.


 So for my version of Mocha Caramel Cupcakes:
(makes 24 cupcakes)

Fill coffee filter with:

3 generous tablespoons Godiva coffee (or another chocolate-y blend)

Pour boiling water through it over a measuring bowl until the liquid reaches the 2 cup level. Then stir in:

1 1/5 packets instant Columbian coffee (or your preferred blend, just be sure it's strong)


Put the coffe in the fridge to cool and sift together:
2 cup flour
3/4 cup cocoa powder
2 tsp baking soda
1/2 tsp baking powder
pinch of salt


And cream in the mixer:
1 cup butter
2 cups sugar


Add:

3 eggs
1 tsp vanilla


Alternate adding the coffee mixture and the flour mixture to the mixer, mixing each time until just incorporated and ending with flour. 


I poured my batter into a cupcake tin that I greased with shortening because I wanted to slice them in half and layer with the chocolate caramel sauce (which I didn't have time to make, and bought - Archer Farms brand). You can do it that way or bake as usual with cupcake liners. Regardless, bake for 20-23 minutes at 350 degrees. Sadly, I accidentally didn't get any close up photos of the finished products, but you can catch a glimpse at the end of this post, and here are the finished cakes.


Now, for my final cupcake, as some of you might know, I wanted to do a Jasmine Fig Cupcake. I adore the scent of jasmine, and love to bike around town during the summer, catching whiffs of it here and there, so I would have loved to capture it in a cupcake, unfortunately, none of my methods were successful and so I fell back on the tried and true lavender. These were delicious and sold out, just like my Lavender Honey Cupcakes last month.

Lavender Raspberry Cupcakes
(makes 24 cupcakes):

First, I wanted to make lavender sugar, a fairly easy process. In the food processor, combine:
1/2 cup sugar

2 heaping tbsp dried lavender

You may need to pick out bits of lavender that didn't get fully ground.


You also want to crush:
1/3 cup raspberries

And cook them in a saucepan with a bit of sugar in order to evaporate away some of the water. I even added a little cornstarch (like, in 1/4 tsp increments) to thicken things up. I then put that in the fridge to cool while I prepared my batter.


Now we can use the lavender sugar with the recipe. Cream together:
1 cup butter
1/2 lavender sugar
1 1/2 cup white sugar


Add:
4 eggs
1 1/2 tsp vanilla

Sift:
3 cups cake flour
1 tbsp baking powder
a pinch of salt

Alternate adding the flour mixture and 1 cup milk to the mixing bowl, mixing until just incorporated and ending with the flour. Then fold in the raspberry mixture. Pour into a baking tin and cook for 20-23 minutes at 350 degree.


Baked and frosted!

My final recipe is the tasty frosting I used on the cupcakes that I didn't use super fancy piping techniques for (the lavender raspberries above is one of them):

Pour into the mixing bowl:
1/4 cup vanilla instant pudding powder
1/4 cup sugar
3 cups whipping cream
1 tsp vanilla

Mix it all on low speed for a minute or two, then bump up to medium high speed. Continue to mix for 6 or 7 minutes, or until the consistency is somewhat stiff. This frosting will not be as stiff as butter cream, but you can pipe it out into nice little blobs on top of your cupcakes, especially if you let it sit for 15 minutes or so in the fridge. If it sits out for awhile, it will droop a bit, especially if you haven't let it sit in the fridge. For my show, since they were sitting out, I frosted them in the morning, let them sit in the fridge for most of the day, then took them out at night and they held up pretty well.


The other cool thing about this frosting is that you can add things too it. I added food color to get the lavender shade and added lemon juice and zest to the frosting for the Earl Grey Cupcakes. This can make the frosting a bit less stiff, so beware :)

Pictures from the event!


Friday, July 27, 2012

Business Time

If you're here because you picked up my card at RAW Mixology, welcome! 
You perhaps are interested in what I do and if I could possibly make you tasty food to eat and serve to your guests. I can! 

This blog has been primarily for fun and not for business, and will likely stay that way. However, you can flip through and enjoy what I am all about and get ideas about the sorts of things I do. Know that I am always experimenting with flavors and love to try new things :)

A word on pricing. All of the cupcakes at the event were $2 to make things easier, but typically I need to charge $2.50 ($30 per dozen) for "regular" cupcakes (yellow, chocolate, mocha, etc - basic flavors that don't require expensive ingredients) and $3-$3.50 ($36-$42 per dozen) for "fancy" cupcake (cupcakes with fruit in them, or another ingredient that is a bit pricey for me).

If you liked the cupcake you sampled at the event and want me to bake for your wedding, birthday, bar mitzvah, funeral, etc or if you are just thinking you'd like someone to bake desserts for you for no reason at all, shoot me an e-mail at emily.knight7@gmail.com. I'd love to talk baking with you!

Thursday, July 19, 2012

Another Cupcake Test: Rose Cherry Cupcakes

Rosebuds! Pretty, but not necessarily tasty!
I worked on another recipe for my exhibit in the RAW Mixology Showcase last night: Rose Cherry Cupcakes. These were delicious; far more delicious than the ones I tried to make last week with dried rosebuds. 
Luckily, the International Gourmet Market had a whole three choices on what brand of rosewater I wanted to use. It was by far the largest rosewater selection I have yet encountered, plus the market was full of other delightful products, like grape leaves for dolmas and Turkish Delight for tummy aches.

Rose Cherry Cupcake Recipe 

(makes 10 cupcakes)

Like before, I began by prepping my fruit. I pitted 30 cherries and diced them until I had a pile of fairly small cherry chunks.

Then, I put them in a saucepan over low heat. I poured in some simple syrup to taste (probably a little less than a 1/4 cup) and about 2 tsp rose water. I let them cook and get soft and a bit syrupy in the pan for a bit, then let them cool to the side.


While they cooled, I whipped in the mixer:
1/2 cup butter
1/2 cup sugar

When they were creamy, I added:
1 egg
2 egg yolks
1/2 tsp vanilla
1/3 cup coconut milk


Then I sifted:
3/4 cup flour
3/4 tsp baking powder
Pinch of salt


Add the flour mixture, bit by bit, to the butter, sugar, egg mixture already in the bowl. Mix until just combined.

Add:
2 tsp rosewater
Your cooked cherries

to the batter and swirl with a toothpick so the colors are lovely and swirled but not completely combined.

Pour into a baking tin and bake at 350 degrees for 25-27 minutes.


Yum!


I also frosted the little guys with a tasty whipped cream frosting! I love this recipe because it is not too sweet and you can decorate with it AND it will stay relatively firm even if it sits out on a warm day, as long as it's not in direct sunlight. Perfect! It even stood up to my food coloring, as my frosting color powders haven't come in the mail yet. What a strong little guy I cooked up!


Whipped Cream Frosting Recipe
(makes 2 1/2 cups)

Mix:
1/2 cup softened butter
1/2 tsp vanilla (I used rose water instead)

Do this until it is completely white and doubled in size (10 min)

Leave the mixer on and pour in:
1/4 cup whipping cream

Mix for another 2-4 minutes and add:
1/4 cup confectioners sugar! Yes, only 1/4 and it'll be stiff enough! Hooray!

Incorporate that and you're done!


So tasty and pretty!


In other news, I got my business cards in the mail today! They are so cute and delightful! Hopefully someone needs some tasty treats for a wedding, birthday party, or bar mitzvah soon ^.^

Tuesday, July 17, 2012

Cupcake Test: Earl Grey and Chrysanthemum Peach

In preparation for my cupcake art exhibit at RAW Mixology, I tested out some new recipes last night - Earl Grey Cupcakes and Chrysanthemum Peach cupcakes. I've been really interested in infusing tea in my cupcakes, so these two recipes experiment with that idea.

By the way, if you're in the San Jose area and free on the evening of Thursday the 26th, check out the Mixology show by buying a ticket here. I benefit and you get a free cupcake, as well as access to tons of sweet visual art exhibits, 2 bands, and a fashion show! 


Now, on to the recipes!

I've read several different methods about how to use tea in cakes, and most folks agree that you get the best flavor by brewing the tea in the butter you plan to use. So that's what I did for the Earl Grey Cupcakes. While I was doing it, I was unsure. I mixture smelled tasty, but it smelled more like butter than it did like tea, and when I tasted the batter, I felt the same. Even after I cooked the cupcakes, I wasn't sure it was the flavor I wanted - but I left them to rest and tried them again today, and now I am convinced that they are delicious and definitely Earl Grey tasting and not butter tasting. The trick, I suppose is to not taste the batter before cooking (!), as it will ruin your impression. I've also heard that keeping the butter hot but not boiling (and definitely don't let it brown) is helpful, so I'll be more careful about that during the next batch.

Earl Grey Cupcake Recipe (makes 1 dozen)

To infuse the butter:

1/2 cup (1 stick) butter 
6 bags of Earl Grey tea 


Melt the butter in a saucepan. Cut open the tea bags and pour the tea leaves into the just-melted butter. Keep the heat low and butter simmering for about 10 minutes, stirring every so often. Remove from heat and let cool. When it isn't so hot that it will burn you, strain the leaves out. I found that my Earl Grey was so finely ground that I needed to use a coffee filter, though a mesh trainer might work for you. I did have to squish and squeeze the filter to get as much butter as I wanted out, so watch out for that (that's why you want to let it cool).

My tea-straining system


Meanwhile, whip in a mixer:

2 egg yolks (save the whites)
1 tsp vanilla extract
2/3 cup brown sugar

Add:
1/2 cup milk

And sift in a separate bowl:

1 1/2 cup cake flour
2 tsp baking powder
a pinch of salt


Alternate adding the flour mixture and the tea-infused butter to the egg-and-sugar mixture until everything is just combined. 


Beat
2 egg whites
1/4 cup white sugar

until the mixture is foamy and starts to form very soft peaks. Carefully fold it in to the batter, until just incorporated. This will give them a nice lightness that's perfect for tea flavors. 

 Pour the batter into your cupcake tin and bake for about 15 minutes on 350 degrees.

I'll be frosting all of these test cupcakes tomorrow or Thursday, and I imagine a lemon honey frosting will be perfect for these little guys. Pictures to follow!


~~~


I used the second favorite tea-infusing technique for the Chrysanthemum Peach Cupcakes and I think it worked perfectly! This technique has you brew the tea in warm milk, which may or may not be used in your recipe of choice. It's said to produce a more mild tea flavor, which works perfectly for these cupcakes, as chrysanthemum is a mild tea. Rest assured, though, you can definitely taste and appreciate it in every bite of these cupcakes.


Chrysanthemum Peach Cupcake Recipe 
(makes 9 cupcakes - I made such a little batch as a test)


To start out, you want to prepare your peaches. I used Saturn Peaches because 1) they are awesome looking and 2) they happened to be ripe, but you can use whatever variety you prefer. 

Wash and cut three peaches into 1/2 inch pieces and roast them in a 400 degree oven for 25 minutes (I placed mine on parchment paper, so they didn't stick). 


As they cook you can infuse your milk.
Heat in a saucepan:
1/4 cup coconut milk*
1/2 tsp vanilla
1 1/2 tbsp chrysanthemum tea leaves

Be careful the milk stays warm but not scalding and stir frequently for 15 minutes. After that, let is sit and cool for a bit, then strain the leaves out with a mesh strainer.

*A word on the milk: I like coconut milk a lot, and it's what was in my fridge. You can certainly do this with regular milk, but I would suggest not using whole milk, as it is more creamy and milky tasting - you want the tea to be able to shine through)


As that cools, begin to prepare your batter.
Cream in a mixer:

1/4 cup white sugar
1/4 cup brown sugar
1/4 cup butter
1 egg


Sift in a separate bowl:

3/4 cup cake flour
1/4 tsp baking soda
1/4 tsp baking powder
a pinch of salt


Alternate adding the dry ingredients and the strained milk to the batter and mix until everything is just incorporated. 


*At this point, I tasted the batter and was unsure if the tea flavor was coming through enough, so I filled some of the cupcake liners with the batter, then added a bit of the tea leaves to the rest of the batter and filled the remaining liners with that. The resulting cupcakes tasted slightly more chrysanthemum-y after I added a bit of the leaves, and since the leaves were so thoroughly wet and saturated with milk, you didn't notice them in the cupcakes. So if you want to mix in about half the leaves into the batter before cooking, go for it. I should say, though, that either way, the cupcakes have a distinctly chrysanthemum taste.

Finally, fold in the roasted peach pieces and pour the batter into the cupcake tin, cooking for 18-20 minutes at 350 degrees.

The finished cakes! (Chrysanthemum Peach in foreground, Early Grey in background)

Stay tuned for my next experiment: Rose Cherry cupcakes!
And, of course, the thrilling frosting finale!